time4sleepwww.time4sleep.co.uk
Instructions by time4sleepFrancesca Ottoman Bed Frame
time4sleep

Francesca Ottoman Bed Frame

Francesca Ottoman Bed Frame
Before you start
Knowledge **General Hints & Tips** Care & Maintenance Warnings PartsTools
Steps
1. Frame Connections 2. Cross Bar Attachment and Alignment3. Mechanism Installation and Alignment4. Attach Fabric Base Cover 5. Base Board Securing6. Support Rail Installation7. Cross Bar Fastening and Alignment8. Safety and Storage Guidelines

No results

time4sleep
time4sleep / Francesca Ottoman Bed Frame
Francesca Ottoman Bed Frame
time4sleep

Instructions by

time4sleep

Francesca Ottoman Bed Frame

Assembly instructions for Francesca Ottoman Bed Frame by Time4Sleep.

Product Information

Francesca Ottoman Bed Frame

Francesca Ottoman Bed Frame

The Francesca Ottoman bed combines style and practicality. The platform ottoman base can be simply raised and lowered with the assistance of the gas lift mechanism to reveal a large storage area which is approximately four times greater than a typical storage divan. The space saving design means the mattress sits on top of the sleeping platform which sits on the side rails, this helps to minimise the footprint of the bed making it the perfect option for smaller rooms.
Double
Overall Dimensions (LWH CM)199 x 138 x 114
Storage Dimensions (LWH CM)190 x 133 x 31
Piston Rating900N

Knowledge

  • Please read this sheet prior to assembly to familiarise yourself with the various stages of construction. Carefully open the pack supplied and check the contents against the parts and fittings check list.
  • Do not destroy any of the packaging until you are certain that you have all the necessary parts for the assembly.
  • Please ensure that the packaging is disposed of in a safe environmentally friendly way.
  • Caution: There are small components used in the construction of this unit. These loose items should be kept away from young children during assembly, to avoid danger of choking.
  • Important: Before starting to assemble the bed - please read these instructions carefully.

General Hints & Tips

  • Two person assembly
  • Please retain your assembly instruction and tools provided for future use. Periodically check that all bolts are still tight.
  • It is possible to assemble the mattress base boards to left side or right side of the bed, from whichever side access is needed.
  • The media tray can also be fitted to left or right side of the bed. It must always be fitted as shown, towards the foot end of the bed.

Care & Maintenance

In the unlikely event of missing or damaged parts, please contact your retailer. Please have this guide at hand quoting the part code reference numbers shown when requesting spare or replacement parts.

Warnings

  • You must ensure that the mattress is on the bed frame before operating the lift mechanism,

failure to do so could result in injury.

  • Keep hands clear of the mechanism when opening or closing the ottoman.
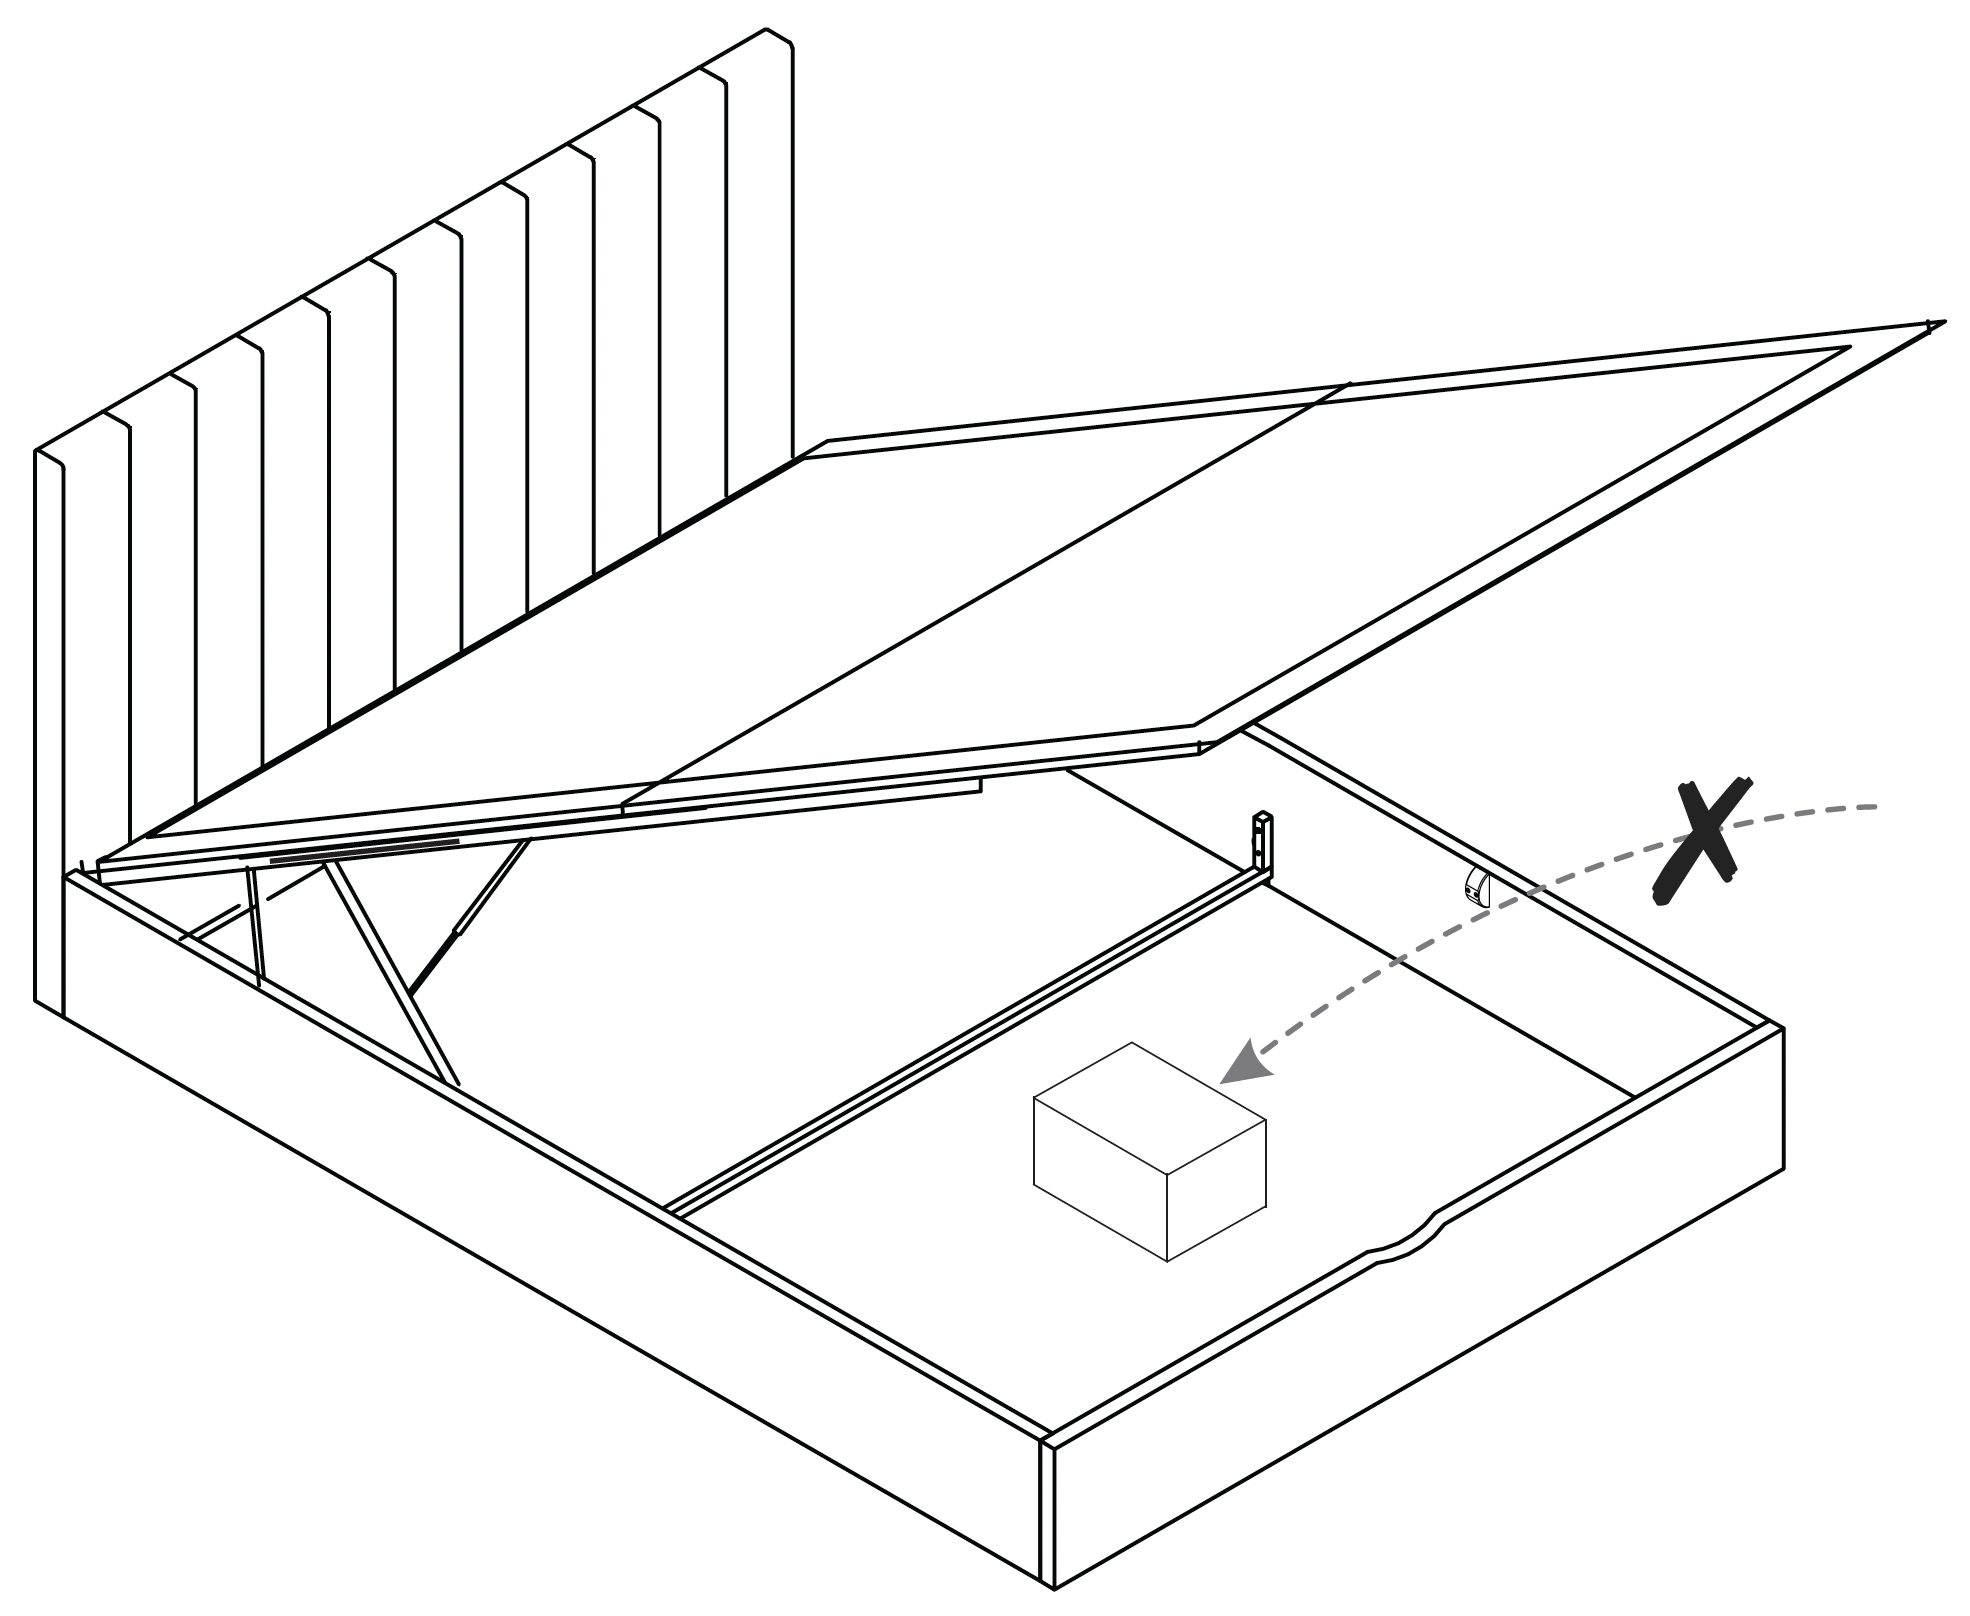
  • Beware of entrapment – Never reach in through the mechanism to access the storage area.

Always ensure that the ottoman is FULLY opened before accessing the storage area.

  • Do not exceed the maximum weight as specified in the table below:

| Bed Size | Min Weight (kg) | Max Weight (kg) |
| :------- | :-------------- | :-------------- |
| Double | 15 | 50 |
| King | 15 | 50 |

  • Use caution when operating, always use the handle when lifting.
  • Note: This bed uses a pressurised mechanism.

To be operated by adults only.

  • Please ensure that children and pets are kept away from the bed when operating the

mattress board lifting mechanism.

  • Keep children and pets away from the storage area.
  • Do not overload the internal storage base.
  • Do not stand inside the internal storage area of the bed.
  • Before removing the mattress secure the frame to ensure it does not open unexpectedly.
  • Do not attempt to lie on the mattress when the ottoman is in the raised position.

Tools

A - Corner Brackets - Box 2
B - Bolts (M8x20mm) for fitting side rails (3&4) to headboard & footboard - Box 2
C - Flat washer for M8 bolts - Box 2
D - Spring washer for M8 bolts - Box 2
E - Bolts (M8x35mm) for fitting gas-lift mechanisms (10&11) to side rail (3&4) - Box 2
F - Plastic spacer for gas-lift mechanisms - Box 2
G - Lock nut for M8 bolts - Box 2
H - Allen key for M8 bolts - Box 2
J - Spanner for M8 nuts - Box 2

Parts

Parts
1Headboard - Box 1
2Footboard - Box 2
3Side Rail - LH - Box 2
4Side Rail - RH - Box 2
5Mattress Base Boards - Headend - Box 1
6Mattress Base Boards - Footend - Box 1
7Angled Corner Bracket - Box 2
8‘U’ Shape Cross Bar - Box 2
9Fabric Base Cover - Box 1
10Gas - Lift Mechanism - LH - Box 2
11Gas - Lift Mechanism - RH - Box 2
12Gas Lift Pistons - Box 2
13Support rail for Mattress Base Boards - End - Box 1
14Support Rail for Mattress Base Boards - Centre - Box 1

1. Frame Connections

  • Attach the side rails (3 & 4) to the headboard (1) and footboard (2) using the corner brackets (A).
  • Secure each bracket with bolts (B), flat washers (C), and spring washers (D).
  • Use the Allen key (H) to tighten the bolts.
  • Ensure all connections are secure and aligned properly.

2. Cross Bar Attachment and Alignment

  • Attach the 'U' shape cross bar (8) to the side rails (3 & 4) using bolts (E) and flat washers (C).
  • Secure the bolts using the Allen key (H).
  • Ensure the cross bar is aligned properly with the side rails.

3. Mechanism Installation and Alignment

  • Attach the gas-lift mechanisms (10 & 11) to the side rails (3 & 4) using bolts (E), flat washers (C), spring washers (D), and plastic spacers (F).
  • Secure the connections with lock nuts (G) using the Allen key (H) and spanner (J).
  • Ensure the mechanisms are properly aligned and securely fastened.

4. Attach Fabric Base Cover

Warning! CAREFULLY LIFT BOTH THE HEADBOARD & THE FOOTBOARD AT THE SAME TIME, DO NOT LET THE BED TWIST.

  • Lift and turn bed on its side and with assistant holding bed upright for safety, attach the fabric base cover (9) to bottom of side-panels, headboard & footboard using the velcro tape.
  • Make sure fabric is fixed evenly all round.

Warning! CAREFULLY LOWER BED BACK DOWN EQUALLY, PLEASE DO NOT LET THE BED TWIST. BE CAREFUL AS BED IS HEAVY

5. Base Board Securing

  • Attach Mattress Base Boards: Secure the mattress base boards (5) to the gas-lift mechanisms (10 & 11) using bolts (B), flat washers (C), and spring washers (D).
  • Use the Allen key (H) to tighten the bolts, ensuring the boards are properly aligned and securely fastened.

6. Support Rail Installation

  • Secure Support Rails: Attach the support rails (6) to the mattress base boards (5) using bolts (B), flat washers (C), and spring washers (D).
  • Align the support rails with the pre-drilled holes on the base boards.
  • Use the Allen key (H) to tighten the bolts, ensuring the support rails are securely fastened.

7. Cross Bar Fastening and Alignment

  • Secure the Cross Bar: Attach the 'U' shape cross bar (13) to the support rails (6) using bolts (B), flat washers (C), and spring washers (D).
  • Insert the bolts through the pre-drilled holes in the cross bar and support rails.
  • Use the Allen key (H) to tighten the bolts, ensuring the cross bar is securely fastened and aligned with the support rails.

8. Safety and Storage Guidelines

  • Be very careful what you store under the bed - the top of an item, like a suitcase or a box, must not touch the slats or they may be damaged.
  • Maximum storage height is 31 cm.
  • Only store items that fit safely within this limit to ensure the bed operates correctly and safely.
time4sleep
time4sleep (opens in new tab)Terms (opens in new tab)Privacy (opens in new tab)